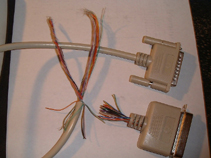
OK, lets get our hands dirty. First thing you're going to
do is cut (or take apart) the head off the printer end head of the printer
cable. Not the end that goes into your computer, cut the end that goes
into the printer like so. You don't have to cut it off right at the
end like I did. Cut it as long as you need it. But make sure you don't
cut to short.
This is a good time to slide a piece of heatshrink tubing over the open
end of the cable. Because you won't be able to after you start
soldering.

Now is the worst and most time consuming part of the project. You have
to separate and label all 25 wires. The best way to do this is use a multi-meter
to test continuity. If you don't have one click
here to learn to make a a
small continuity tester. Each wire is color coded. Just write down the
the pin number and the wire color.
I've broke down the wiring into 3 diagrams. The first diagram is the data line connections

 Who's online?


 News Submission
)
)
)
)